The teaser pic in the previous entry is showing marking the hardware for hole placement.
You know the saying “measure twice, cut once”? Well I must have measured and moved and re-taped half a dozen times before marking. In fact I did it in 2 steps – I drilled and fitted the pickguard first, then lined up the bridge and (loaded) Fender spec control plate with the fitted pickguard, marked and drilled. I used a drill bit one or two sizes smaller than the screws – for the pickguard screws 2mm bit and the bridge screws a 2.5mm bit. A piece of tape around the bit to mark the depth and a cordless drill. I decided the drill press was overkill.
I’m using slot head screws for everything on this build, because they look cool! Available in the store.
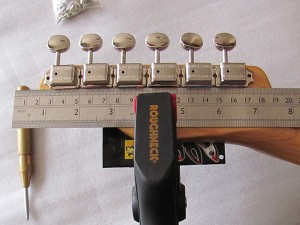
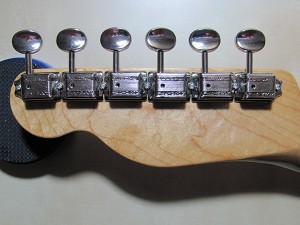
Tuners next. I’m fitting Wilkinson WJ55 Vintage Kluson Style split post tuners in nickel. 10.2mm bushes were a nice fit with just finger pressure. Easy as pie – install bushes, fit machine heads, clamp a straight edge along the bottom of the tuners and mark the screw hole locations. Remove the tuners and use a centre punch to mark a starting point for the drill bit and drill using the usual method (above).
I should note that all the screws were lubricated with candle wax before installation. This aids installation and prevents snapping the tiny screw heads off (fingers crossed).
Before wiring it up I drilled the neck mounting holes. I had planned to mount the bridge and clamp the neck in place and run string around both E tuners to the bridge to line everything up perfectly with the pickup, however I will admit to being slightly impatient. I simply held the neck firmly in place with one hand and marked drill hole locations with a drill bit through the body.
 I then clamped the neck to my “workbench” with a towel to protect the frets and a bit of card to protect the back of the neck and drilled with the hand drill. I had planned to use the drill press to ensure the holes were perfectly vertical, however I had no way of securing the neck to the press table (don’t forget, those frets are curved!). I took my time and they came out just fine.
Time to wire it all up. I’m no fan of soldering, but it really isn’t that hard if you take your time. I’m using a Tonerider Hot Classics pickup – I’ve heard good things and I’m looking for a ballsy sound. I decided on a slightly weird wiring scheme for this Esquire. I don’t like the regular Esquire setup – I’m not a gigging muso and have no need for the “no tone” or “muddy as $#*!!” positions. I also like the Greasebucket circuit I have fitted to my American Standard partscaster and the Eldred/cocked wah mod I have on a SD Little 59 equipped Esquire I built. So using this diagram (a fantastic resource for wiring diagrams) as a starting point I added in the Greasebucket to come up with a scheme with volume + tone, Eldred mod and a bass rolloff, no tone, with Greasebucket.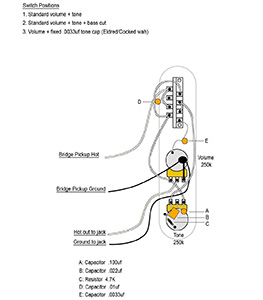 No pictures of the wiring itself I’m afraid. On first plugging in the guitar it was obvious I’d done something wrong – the tone didn’t work at all and the buzzing was ridiculous. A quick check and I discovered I had reversed the connections to the jack (not the first time either!) and the .100uf cap was connected to ground instead of the middle tone lug. Sorted those two problems out and the tone works correctly and there’s no buzzing at all. EDIT>>I have since removed the greasebucket circuit and replaced it with a 50s style tone circuit.
Time for assembly!
Strap buttons, the obligatory electrosocket, a nice thick plain neck plate and a vintage round string tree and the guitar is in one piece.
I simply bolted everything together and eyeballed the saddle height and tuned to pitch. Over the next 15 minutes or so I played it and adjusted the saddle height to my preference and then checked intonation. It is very close, certainly close enough for someone like me who doesn’t venture up the dusty end too often! I must be extremely lucky, or extremely gifted! I know which my money is on…
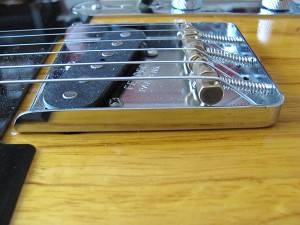 I haven’t set the pickup height yet, or checked the neck relief. I am going to let everything settle down over the next week then give it a proper setup. I am very happy with the playability as it is though. The saddle height is up enough so I do not catch the lip of the Fender bridge plate when giving it some wellie or picking and I love the medium V profile of the neck. I’ve got a cheap set of strings on it at the moment, knowing I will be putting on EB 10-46 Slinkys when I set it up. When I change the strings I will also steel wool the remaining shellac from the frets I totally forgot about in my haste. “To-do” lists are a must!
The strings are dead centre over the pole pieces and the nut height seems to be ok – I used this method as a starting point. Over the next week I’ll get a feel for the action and decide if it needs adjusting.
All in all, I am extremely happy with the result.
The big reveal later tonight!
Comments